How to make your own Butterfly-Wreath / Mach dir deinen eigenen Schmetterlingskranz
Hi there!
(1) You'll
need a polystyrene ring.
Mine measures 25 cm in diameter and has a
flattened back.
(2) Crochet
a cover for this ring.
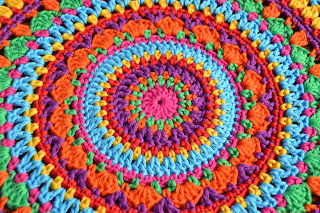
Still thrilled by Stylecraft Merry Go Round
Candy Crush (which stills feels more like strawberries to me), I
simply had to crochet the cover using this yarn. I started with 30
chain stitches and made 133 rows of double crochets (back loops
only).
(3) Cover
the ring with your cover.
(4) Now
you'll need a lot of butterflies.
There are plenty of free patterns
to be found on the internet. I choose these two (not sticking to the
instructions all that faithfully though): large butterfly and small butterfly.
(5) Maybe
the odd flower too?
Mine was made following this pattern (well, sort
of... I did skip a few of the chain stitches).
(6) And
you could do with some ribbon (approx. 1,2 m).
(7) Fix
butterflies, flowers and ribbon this onto the ring with pins.
(8) When
you're happy with the result, fix the pieces onto the ring
permanently.
You could sew them onto the cover (this certainly is a
very elegant way), but I preferred using my hot glue gun (even though
you cannot correct any mistakes anymore afterwards).
(9) Think
of a way to hang your wreath up.
You could either use some ribbon, an
eyelet or a metal loop. I still had some metal half-loops in a drawer
and used one of these.
Ta-Dah!
"Mach dir deinen eigenen Schmetterlingskranz!"
Liebe Freunde!
(1) Zunächst
braucht ihr einen Styroporring.
Meiner hat einen Durchmesser vom 25cm
und eine abgeflachte Rückseite.
(2) Häkelt
nun einen Bezug für diesen Ring.
Da ich Stylecraft Merry Go Round
Candy Crush immer noch sehr mag (auch wenn es mich weiterhin an
Erdbeeren erinnert), wählte ich diesen Garn. Ich fing mit 30
Luftmaschen an und häkelte 133 Reihen feste Maschen (immer in das
hintere Maschenglied einstecken).
(3) Bezug
um den Ring befestigen.
(4) Nun
braucht ihr eine Menge Schmetterlinge.
Im Internet gibt es dazu
unzählige Anleitungen. Ich wählte diese beiden (mit der einen oder
anderen Änderung...): großer Schmetterling und kleiner Schmetterling.
(5) Vielleicht
noch eine Blume?
Dieses Muster begleitet mich schon etwas länger,
wenngleich ich in den Runden 2-4 immer eine Luftmasche weniger
häkele!
(6) Jetzt
noch ein Stück Schleifenband
(ca. 1,2 m).
(7) Befestigt
die Schmetterlinge, Blume(n) und das Schleifenband mit
Stecknadeln auf dem Ring.
(8) Wenn
euch das Resultat gefällt, dieses dann dauerhaft befestigen.
Selbstverständlich könnte man die Teile festnähen, aber ich habe
lieber meine Heißklebepistole gezückt... (ACHTUNG: Einmal
befestigt, können Fehler nicht mehr korrigiert werden).
(9) Nun
noch überlegen, wie der Schmetterlingskranz aufgehangen werden
sollte.
Entweder mit einem Stück vom Schleifenband, mit einer Öse
oder mit einem D-Ring. Da ich noch einige davon im einer Schublade
fand, war meine Wahl schnell getroffen...
Fertig!


It is so beautiful. Thank you for sharing.
AntwortenLöschenLove the colors. And I envy you Your patience, I never seem to keep up With all those small parts... Have a Nice day
Actually, I do prefer these small parts, larger projects take soooo long to finish...
LöschenOh das ist ja ein toller Kranz !
AntwortenLöschenIch habe mal einen bestrickt, aber ich muß sagen, Dein behäkelter Kranz gefällt mir sehr. Besonders die Blumen finde ich sehr schön, aber er ist insgesamt sehrstimmig !
LG
Käthe
Vielen, lieben Dank!
LöschenWoooooow... zo wil ik er ook wel eentje... of 2! :-)
AntwortenLöschenIk hab er drie!!! (Nog...)
LöschenAnother beautiful creation, Marjan! Your projects always make me smile :)
AntwortenLöschenThat sounds great! Happy to make you smile! Have a nice Sunday, Marjan
LöschenSuch a lovely wreath! I love the bright colors and butterflies!
AntwortenLöschenNavy Wifey Peters @ The Submarine Sunday Link Party
Thank you very much!
LöschenThank you so much for sharing at my link up last week. Congratulations for being 2.
AntwortenLöschenA New party will be open soon.
Wow! That is lovely! Thank you for featuring my wreath!
LöschenYour butterfly wreaths are really beautiful! I haven't made a crochet wreath in a while, but seeing yours inspires me to want to make one really soon! I love the color schemes you used to make these wreaths. I think the blue and white one would be perfect for our house right now since we're having a Disney Frozen themed Christmas. Anyhoo... Thanks for sharing at last week's Submarine Sunday, and your wreaths will be featured at this week's party!
AntwortenLöschenThank you very much for featuring the Wreaths! As soon as I'm back home I'll write down which yarn I used for the wreaths. Have a nice week, Marjan
LöschenIs this double crochet uk stitch which is the same as sc u.s. stitch?
AntwortenLöschenHello Ruth. Yes dc (UK terms) is sc (US terms). Happy crocheting!
Löschen