How-to Granny Square Curtain / Anleitung Granny Square Gardine
How-to
make a Granny Square Curtain
Dear friends,
I've
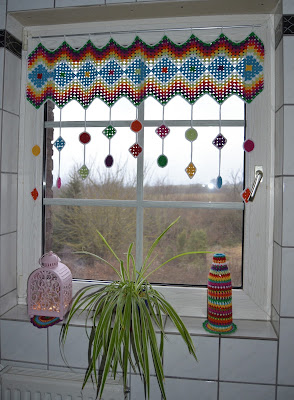
promised on Saturday I'd post a how-to for the bathroom curtain.
Remember
what it looks like?
 |
| Moneypenny only tried to catch the pendants once! |
Well,
and that's what you'll need:
- yarn
- crochet hook
- sewing needle and scissors
You'll
start with a granny square as large as you like it to be.
Now
you'll make another granny halting at the last corner:
- make 3 tr in last corner loop (1)
- ch 1 (2)
- insert hook in loop of 1st granny (3)
- pull ch 1 through (4), make ss around loop (5), ch 1 (6)
- 3 tr in last loop (7)
- finish granny as usual
Following
above instructions you can attach as many grannies as you'd like.
If
you've got enough grannies, you'll continue as follows:
- 1 tr in corner loop (1)
- (3 tr + ch 1) in next loop (2)
- continue
- corner: 3 tr + ch 2 + 3 tr + ch1
- continue
- V-shaped corner: 3 tr + skip join + 3 tr + ch 1 (3a + b + c)
- continue all along the joined grannies till: 3 tr in one-but-last loop
- 1 tr in last loop (4)
You
may repeat this row as many times ad you'd like the curtain to be
broad.
Repeat
on the other side.
Once
you've finished this step, you'll crochet the loops for the curtain
rod.
- 1 dc in 1st tr (1)
- skip one stitch (2)
- 1 dc in each stitch and around each loop (3)
- corner: 1 dc (4) + as many chain stitches as needed to go round curtain rod (5) + 1 ss in 1st ch (6a + b) + 1 dc in corner loop (7)
- 1 dc in each stitch and around each loop
- V-shaped corner: 2x 1 dc in last cluster (1) + 1 dc2tog in last tr of last cluster and in 1st tr of next cluster (2a + b)
- 1 dc in each stitch and around each loop (3), till: skip one-but-last tr
- 1 dc in last tr
If
you do not care about the dangling bits, you might finish the other
side pretty much the same way, omitting the loop-parts.
If
you'd like the pendants though, here we go:
- 1 dc in 1st tr
- skip one stitch
- 1 dc in each stitch and around each loop
- corner:
- 1 dc (1) +
- as many chain stitches as you like (I started with ch 30 on the first pendant, ch 25 in the next, down to ch 10 in the middle and back to ch 30 for the last pedant) (2) +
- integrate small granny square as follows:
- 1 dc in 1st corner loop of granny (3)
- 1 dc in each stitch and around each loop (4)
- corners: 1 dc + ch 1 + 1 dc (5)
- 1 dc in 1st loop of granny (6)
- now you either make 1 dc in each ch (7) or 1 ss in each ch (8) (I preferred the latter) +
- 1 dc in corner loop (9)
- 1 dc in each stitch and around each loop
- V-shaped corner: 2x 1 dc in last cluster (1) + 1 dc2tog in last tr of last cluster and in 1st tr of next cluster (2a + b)
- 1 dc in each stitch and around each loop (3), till: skip one-but-last tr
- 1 dc in last tr
You
can make as many pendants as you want, and you can integrate as many
granny squares as you like per pendant.
Happy
crocheting!
I'll
keep in touch!
P.S.:
Most probably you'll have to block the curtain before putting it up.
Anleitung Granny Square Gardine
Liebe Freunde,
am
Samstag habe ich eine Anleitung für die Badezimmergardine
versprochen und heute ist es so weit!
Ihr
wisst noch wie die Gardine aussieht?
 |
| Moneypenny hat nur einmal versucht die Anhänger zu fangen |
Nun,
was werdet ihr brauchen:
- Garn
- Häkelnadel
- Stopfnadel und Schere
Zunächst
ein Granny Squre häkeln, in der Art und so groß, wie gewünscht.
Jetzt
ein zweites, gleiches Granny häkeln, jedoch bei der letzten Ecke der
letzten Reihe eine Pause einlegen:
- 3 Stb in diesen LmB (1)
- 1 Lm (2)
- Häkelnadel in Ecke des ersten Grannys einführen (3)
- Luftmasche des zweiten Grannys durchziehen (4)
- Km um LmB (5)
- 1 Lm (6)
- 3 Stb in Lmb (7)
- Granny wie gewohnt beenden
Nach
dieser Vorgehensweise so viele Grannys aneinanderhäkeln, wie
gewünscht.
Dann
geht es wie folgt weiter:
- 1 Stb in EckLmB (1)
- (3 Stb + 1 Lm) in nächsten LmB (2)
- …
- Ecke: 3 Stb + 2 Lm + 3 Atb + 1 Lm
- …
- V-förmige Ecke: 3 Stb + Verbindung überspringen + 3 Stb + 1 Lm (3a + b + c)
- der ganzen Reihe Grannys entlanghäkeln bis: 3 Stb in vorletzte LmB
- 1 Stb in letzte EckLmB (4)
Auf
diese Art so viele Reihen häkeln wie gewünscht.
Die
andere (untere) Seite nicht vergessen!
Jetzt
die Schlaufen für die Gardinenstange häkeln:
- 1 fM in 1. Stb (1)
- eine Masche überspringen (2)
- 1 fM in jede Masche und um jeden LmB (3)
- Ecke: 1 fM (4) + so viele Lm, wie nötig, um bequem um die Gardinenstange zu passen (5) + 1 Km in 1. Lm (6a + b) + 1 fM in EckLmB (7)
- 1 fM in jede Masche und um jeden LmB
- V-förmige Ecke: 2x 1 fM in letzte Stäbchengruppe (1) + 1x 2zabfM in letztes Stb von 1. Stäbchengruppe und in 1. Stb von nächste Stäbchengruppe (2a + b)
- 1 fM in jede Masche und um jeden LmB (3) bis auf: vorletzte Masche überspringen
- 1 fM in letztes Stb
Wer
keine Anhänger mag, umhäkelt die andere Seite auf ähnlicher Weise,
jedoch ohne die Schlaufen.
Wer
aber Anhänger haben möchte...:
- 1 fM in 1. Stb
- eine Masche überspringen
- 1 fM in jede Masche und um jeden LmB
- Ecke:
- 1 fM in EckLmB (1) +
- so viele Lm, wie gewünscht (ich fing mit 30 an, 25 für die nächste Ecke, bis zu 10 Lm in der Mitte) (2) +
- Umhäkeln von kleine Grannys:
- 1 fM in EckLmB (3)
- 1 fM in jede Masche und um jeden LmB (4)
- Ecken: 1 fM + 1 Lm + 1 fM (5)
- 1 fM in 1. EckLmB
- jetzt entweder 1 fM in jede Lm (7) oder 1 Km in jede Lm (8) (diese Version bevorzuge ich) +
- 1 fM in EckLmB (9)
- 1 fM in jede Masche und um jeden LmB
- V-förmige Ecke: 2x 1 fM in letzte Stäbchengruppe (1) + 1x 2zabfM in letztes Stb von 1. Stäbchengruppe und in 1. Stb von nächste Stäbchengruppe (2a + b)
- 1 fM in jede Masche und um jeden LmB (3) bis auf: vorletzte Masche überspringen
- 1 fM in letztes Stb
Pro
Anhänger können so viele kleine Grannys eingefügt werden, wie
gewünscht.
Viel
Spaß!
Ich
halte euch auf dem Laufenden!
P.S.:
Höchstwahrscheinlich muss die Gardine erst noch gespannt werden,
bevor sie aufgehangen werden kann.


Bin immer noch ganz begeistert von deiner Gardine, sie ist wirklich toll! 100 Punkte!
AntwortenLöschenLG Sandra
Vielen, lieben Dank!
LöschenAnother Sandra, but in English this time!
AntwortenLöschenThank you for the pattern which looks so wonderful against your window. A real decoration. Definitely something to try!
Thank you very much, dear Sandra.
LöschenAnd it's not difficult at all!
Have a great week,
Marjan
Wow, you've really worked hard to make this how-to again so clear and understandable.
AntwortenLöschenJust by looking at your pictures I've learned a lot!
And my mind is already busy with lots of new ideas, inspired by your curtain :-)
Have a very nice day,
Sigrid
Oooh, cannot wait to see what you make out of these ideas. Makes me feel proud knowing I've been able to inspire you with those curtains!
LöschenHave a great week and take care of Bella!
Marjan
Hallo meine liebe Marjan,
AntwortenLöschendie ist aber auch Spitze.... ich überlege schon einige Tage an welches meiner vielen Fenster so eine Gardine paßt. Paar Ideen habe ich schon aber leider im Moment keine Zeit dafür.
Ich wünsche Dir eine gute Zeit
Ganz ♥liche Grüße
Karin
Haha! Ich habe mich auch schon mal ins Wohnzimmer umgeschaut, sehr zum Leidwesen meines Mannes, der befürchtet, dass ich unser Wohnzimmer auch mit so viel Farben traktieren möchte... Aber auch ich habe im Moment keine Zeit dazu.
LöschenLiebe Grüße,
Marjan
Thank you for sharing this great pattern with us! I'm sure a lot of people will crochet this, it looks fantastic on your window!
AntwortenLöschenLove, Anja
Thank you very much, dear Anja.
LöschenHave a great day,
Marjan
Oh, this is clever! Thanks for sharing the pattern, I'd love to give it a try.
AntwortenLöschenAmalia
xo
Thank you very much, dear Amalia!
LöschenHave a great day,
Marjan
Great tutorial, Marjan! I want to make this so bad. Perhaps with the right color combinations, Rip won't complain that it's not black.
AntwortenLöschenHave a lovely day!
Just give it a try, dear Jenny. Rip cannot have it his way all the time, can he?
LöschenHave a great day,
Marjan
liebe marjan,
AntwortenLöschenda hast du aber eine tolle anleitung eschrieben. jetzt aktuell werde ich nicht dazu kommen, aber ich drucke mir das ganze sicherheitshalber mal aus, dann hab ich es :).
denn diese gardine ist wirklich ein schmuckstück und deine farben finde ich so klasse, einfach schön!
Liebe Grüße von der Insel Rügen,
MAndy die hummel...
Danke, liebe Mandy,
Löschenwenn ich bloß etwas mehr Zeit hätte (und weniger Häkelprjoekte in der Mache...) würde ich am liebsten das Wohnzimmer auch noch Gardinentechnisch behäkeln... Muss leider noch was warten...
Schönen Sonntag,
Marjan
Liebe Marjan,
AntwortenLöschensieht klasse aus Dein Granny Square Curtain ! Tolle Farben hast du ausgewählt, so richtig nach meinem Geschmack !!! Von Deiner Idee der Anhänger in verschiedenen Farben und Formen bin ich begeistert, das gefällt mir ganz besonders. Danke für die Anleitung, wie immer sehr genau und gut nachvollziehbar geschrieben und dazu wunderbar bebildert.
Ich wünsche Dir eine schöne Woche , sei lieb gegrüßt von Carmen t.
Vielen Dank, liebe Carmen!
Löschendanke fuer die Anleitung. Wirklich eine tolle Gardine! LG, Mariam
AntwortenLöschenVielen Dank, liebe Mariam!
LöschenThank you for the tutorial, Marjan, the curtain is stunning!
AntwortenLöschenMy pleasure, dear Irina. Hope you'll enjoy making lots of new curtains!
LöschenOhh Its Really cool Art Thanks For the Post .. I got the Beautiful mandala curtains
AntwortenLöschenMy pleasure!
LöschenThank you for making this astounding article, informative and knowledgeable!! We have so much to learn from this. Anyway, If you are interested and looking for
AntwortenLöschenCurtain Singaporeyou may visit our website. You can also check our available services to offer.
Thank you and More power!!
Thank you very much, dear Brian!
LöschenAwesome article! Would love to try them out someday. For now though, I'm more into curtain fabrication services singapore. Maybe check them out, some other time.
AntwortenLöschenExcellent pattern and very detailed photos. Beautiful work. Loved it. Thank you very much. From São Paulo, Brazil
AntwortenLöschen