Coaster JEDBURGH Untersetzer
Dear friends,
one
evening about two months ago, I was just playing with yarn and
stitches. A magic ring here, throwing in a few trebbles there,
another few chain stitches and a double crochet. I was quite happy
with the result...
Wanted
to try a few halftrebles instead though. Hmm... Much better!
Put
both coasters aside and busied myself with other things.
Now
though, visualising a new project, I remembered the coasters,
unearthed them and tried to pictures them in more than one shade
only. But alas! On the above mentioned evening I had never thought
about writing down the pattern. So I joined all my Stylecraft
leftovers and started retracing my steps.
Would
you mind if I'd share the pattern with you?
Coaster „Jedburgh“
Notes:
(1)
After reading the pattern you may marvel why you hardly ever found
join with slip stitch and chain 3. I prefer to begin a new round (especially when changing colours)
with a chainless start (also known as standing stitch). The finished
crochet piece just looks much better without these annoying chain
stitches. AND: Using a standing stitch also enables me to make an
invisible join...
(2)
This pattern may not be suited for absolute beginners as I reduced
the instructions rigorously to the main features.
(3)
Using Catania (Schachenmayr) and a 3mm hook, the finished coaster
measures approx. 11cm in diameter. This will differ when using
another hook and/or yarn.
(4)
This coaster can be crocheted in any yarn you like (using the
corresponding hook). You could also use oddments (as long as you
stick to the same yarn type and/or thickness, otherwise the result
could not be all that presentable).
Abreviations:
- ch = chain stitch
- FPdc = Front Post double crochet
- htr = half treble
- loop = loop made of ch
- mc = magic circle
- rd = round
- dc = double crochet
- picot = ch 2 + dc in 2nd ch
- ss = slip stitch
- tr = treble
Instructions:
Start
with a mc
Round
1:
ch 3 (= 1 tr), 11 tr into mc,
ss in 3rd ch from start (sorry – no standing stitch here)
Round
2:
12 times [1 htr, ch 1]
Round
3:
12 times [1 tr in htr, 2 tr in loop] (= 36 tr)
Round
4:
9 times [1 tr, ch 2, skip 1 stitch, 1 tr, ch 2] (= 18 tr)
Round
5:
18 times [1 tr in tr, 3 tr in loop] (= 72 tr)
Round
6:
18 times [1 FPdc around tr (which was crocheted in tr of round 4), ch
1, 1 dc in 2nd tr of three, 1 picot, 1 dc in same stitch, ch 1] (= 18
spikes)
And
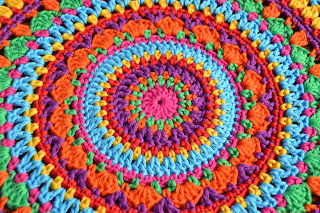
this is what the coaster looks like when using different shades:
P.S.:
Instead of brooding for hours and hours over names for my own
creations, from now on I'll simply name them after places I've been
to and/or I like very much – starting with Jedburgh in Scotland
(because of the Abbey and it's rose window).
P.S.2:
I'll keep in touch!
 |
| Jedburgh Abbey |
Liebe Freunde,
Vor
etwa zwei Monate häkelt ich abends einfach mal drauf los. Ihr kennt
das bestimmt: Einen Fadenring zum Anfang, dann ein oder zwei
Stäbchen, ein paar Luftmaschen dazu und noch eine feste Masche...
Was dabei herauskam, gefiel mir eigentlich ganz gut...
Aber,
ein paar Verbesserungen waren noch drin... Hmm... Besser!
Anschließend
legte ich die Untersetzer beiseite und beschäftigte mich mit
wichtigeren Dingen (Handwerkermarkt und so).
Während
ein neues Projekt Vorgestern so langsam vor meinem inneren Auge
Gestalt annahm, erinnerte ich mich an den Untersetzern. Sie waren
schnell gefunden und während ich mir diese noch in unterschiedlichen
Farben vorzustellen versuchte, fiel mir etwas auf: Ich hatte damals
gar nicht daran gedacht, mir wenigstens ein paar Notizen zu machen!
Also knüpfte ich rasch meine Stylecraft-Reste zusammen und machte
mich daran, meine Schritte zurückzuverfolgen.
Und
da ich das Muster jetzt sowieso herausgeschrieben habe...
Untersetzer
„Jedburgh“
Bemerkungen:
(1)
Nur einmal habe ich in diesem Muster „Kettenmasche in dritte
Anfangsluftmasche“ verwendet. Das kommt daher, dass ich die
einzelnen Runden mit „stehenden Maschen“ (engl.: standing
stitches) angefangen habe, also ohne die störenden
Anfangsluftmaschen. Obendrein gelingt auch so ein unsichtbares
Rundenende.
(2)
Mit Catania von Schachenmayr und einer 3er Nadel gehäkelt, misst der
Untersetzer ca. 11cm im Durchmesser. Mit anderem Garn gehäkelt (und
passender Häkelnadel) wird das natürlich abweichen.
(3)
Meiner Meinung nach kann dieser Untersetzer mit jedem Garn und
entsprechender Häkelnadel gehäkelt werden. Es eignet sich gut, um
Garnreste zu verwerten, aber dabei dann doch lieber bei derselben
Garnsorte und -dicke bleiben, damit das Resultat auch ansehnlich
wird.
(4)
Da ich diese Anleitung aufs Wesentliche reduziert habe, ist sie
vielleicht nicht wirklich geeignet für absolute Anfänger.
Abkürzungen:
ALm
= Anfangsluftmasche
fM
= feste Masche
FR
= Fadenring
Km
= Kettenmasche
Lm
= Luftmasche
LmB
= Luftmaschenbogen
Picot
= 2 Lm + fM in 1. Lm
Stb
= Stäbchen
VR
= Vorrunde
Anleitung:
Anfangen
mit FR
Runde
1:
3 Lm (=1 Stb) in FR, 11 Stb in FR, Km in 3. ALm (= 12 Stb)
Runde
2: 12 x [1 hStb,
1 Luftmasche]
Runde
3: 12 x [1 Stb
in hStb der VR, 2 Stb um LmB] (= 36 Stb)
Runde
4: 9 x [1 Stb, 2
Lm, 1 Stb in übernächste Einstichstelle, 2 Lm] (= 18 Stb)
Runde
5: 18 x
[1 Stb in Stb der VR, 3 Stb um LmB] (= 72 Stb)
Runde
6: 18x [1
Relief-fM um Stb (welches in Stb von Rd. 4 gehäkelt wurde), 1 Lm, 1
fM in mittlere Stb der Dreiergruppe, Picot, 1 fM selbe
Einstichstelle, 1 Lm] (= 18 Zacken)
Übrigens:
So sieht der Untersetzer aus, wenn unterschiedliche Farben verwendet
werden:
P.S.:
Statt weiterhin stundenlang über die Namen meiner eigenen Kreationen
zu brüten, werde ich diese ab jetzt nach Orten benennen, die ich
schon mal besucht habe, bzw. welche ich besonders mag. Der Anfang
macht die schottische Stadt Jedburgh.
P.S.2:
Ich halte euch auf dem Laufenden!
 |
| Die Klosterruine Jedburgh Abbey |


Wonderful! They look like little 'suns' to me :-)
AntwortenLöschenAlways useful, such a pattern, thank's!
Enjoy your Sunday x
They look like suns indeed. I had started off naming them "Spiky Wheel Coaster" though, because of the picots...
Löschenbeautiful in one color or many! thanks for sharing the pattern with us!
AntwortenLöschenMy pleasure! Hope you'll enjoy the pattern!
LöschenAbsolutely beautiful. These will be nice compared to many of the blah coasters seen out there all the time. Thank you for the pattern.
AntwortenLöschenThank you very much! Happy crocheting, Marjan
Löschenthank you so much. How beautiful
AntwortenLöschenThank you very much!
Löschen