Granny-Spiration Challenge 2017 – January (Part I) / Januar (Teil 1)
Dear friends,
welcome
to our first gathering of the Granny-Spiration Challenge 2017!
To take part yourself, follow this link!
To take part yourself, follow this link!
Actually
I skipped my first project and started with project N°2 as I was
sure N°1 would never haven been ready in time. Nonetheless this
project was only finished at the utterly last minute, approximately
12 a.m. (CET) – and I still had to take some pictures, draw the
charts and write this post (as well as the instructions)!
I
had the idea of making a scarf like this quite some time ago, but I
only remembered it when I was brainstorming for the Granny-Spiration
Challenge.
As
my cousin's little daughter turns 3 in February I though it might be
a good idea to make her a scarf. And as making this scarf was such
fun and went pretty fast I made an adult-version too (the next one
could be a little larger though).
Additionally
I made a hat for my cousin's daughter too, but I'll write that
pattern a bit later.
As
time is running short, I'd rather get on with the instructions.
Promise to do better next time!
Material:
- scissors, yarn needle
- crochet hook
- yarn
Abreviations
(UK-terms):
- ch = chain stitch
- loop = loop made of ch
- mc = magic circle
- dc = double crochet
- ss = slip stitch
- tr = treble
- tr2tog = 2 tr together
Instructions
Flower:
Start
with mc
R1:
6x (1 tr2tog + ch 1) in mc
 |
| Round 1 |
R2:
6x (1 dc + 2 tr + 1 dc) in loop
If
you're only interested in the flower: ss in 1st dc, fasten
off thread and weave in ends.
If
you're making the scarf: ss in 1st dc and continue with
Instructions Scarf...
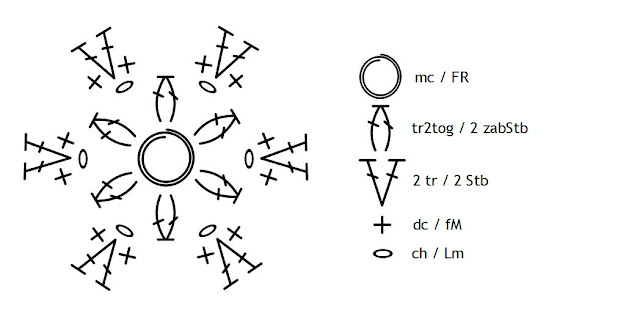 |
| Chart |
Instructions
Scarf:
R1:
Start with a flower. Do not cut the thread but chain 260 stitches
instead. Now you can cut the thread.
R2:
- Make another flower (if needed using another shade) and chain 15 stitches.
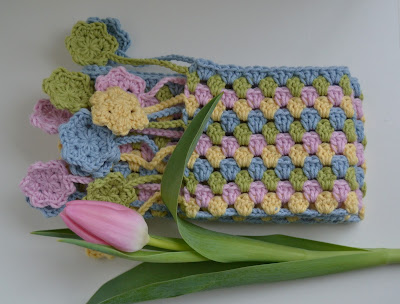
- Insert through the back of the chain stitches (see picture) and crochet 2 tr in that same stitch. As I do my stitches pretty tight I skip 3 stitches and crochet 3 tr into the forth stitch. If your chain stitches are blissfully loose, you might only skip 2 instead. In this case you wouldn't start with 260 either but with 201 chain stitches!
- Continue skipping either 2 or 3 stitches and crochet 3tr into the next stitch, finishing the row with 2 tr into the last stitch, which leave 15 stitches to go till the first flower (of R1).
- Cut the thread
- Turn scarf
R.3:
- Make another flower (if needed using another shade) and chain 15 stitches.
- 1 tr into 1st tr
- 3 tr into each gap (between clusters)
- 1 tr into last tr
- Cut the thread
- Turn scarf
R.4:
- Make another flower (if needed using another shade) and chain 15 stitches.
- 2 tr into gap between first 2 clusters
- 3 tr into each gap (between clusters)
- 2 tr into gap between last 2 clusters
- Cut the thread
- Turn scarf
From
now on you'll repeat row 3 and 4 till your scarf is wide enough.
 |
| Chart |
Good
to know:
The
scarf for my cousin's daughter was made out of Cotton Merino (Drops)
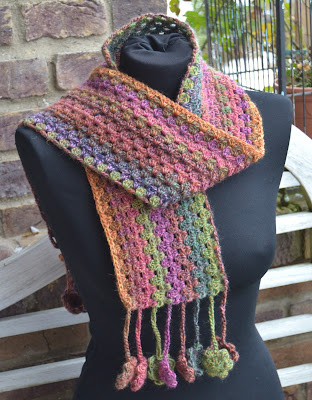
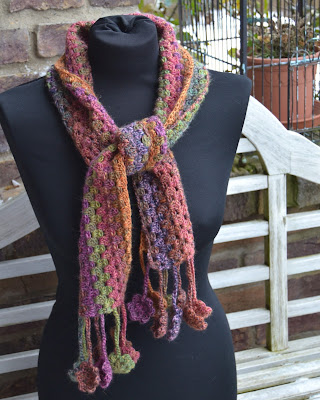
using a N°4 hook. It measures 125 x 10 cm (with flowers).
The
other scarf I made using “Maike” yarn (100% wool), bought at
Lidl's. I used a N°4.5 hook and it measures 143 x 13 cm (with
flowers).
Hope
you've enjoyed this tutorial and see you next time - on the 4th
of February!
I'll keep in touch!
P.S.: have a look at what the others made:
- Sigrid
- Sandra
- Alexandra
- Jenny
- Rachel
- Rhelana
P.S.: have a look at what the others made:
- Sigrid
- Sandra
- Alexandra
- Jenny
- Rachel
- Rhelana
Liebe Freunde,
herzlich
Willkommen beim ersten Treffen des Granny-Spiration Challenge 2017!
Wer teilnehmen möchte: Einfach diesen link folgen!
Wer teilnehmen möchte: Einfach diesen link folgen!
Genaugenommen
stelle ich heute das Projekt vor, das ich eigentlich an zweiter
Stelle machen wollte, aber, da ich das erste nie zeitig fertige
bekommen hätte... Trotzdem habe ich die Häkelnadel erst um 12 Uhr
(CET) aus der Hand gelegt und musste dann noch die Bilder machen, die
Muster malen UND diesen Post schreiben (inkl. Anleitungen)!
Die
Idee einen Schal, wie diesen zu machen, hatte ich schon vor einiger
Zeit, erinnerte mich aber erst daran, als ich Ideen sammelte für die
Granny-Spiration Challenge.
Die
Tochter meiner Cousine hat Anfang Februar Geburtstag und da kam mir
die Idee mit dem Schal gerade recht. Da dieses Muster so viel Spaß
macht und obendrein schnell von der Hand geht, habe ich noch einer
Erwachsenen-Version gemacht.
Der
Tochter meiner Cousine habe ich noch eine Mütze dazugehäkelt (diese
Anleitung schreibe ich zu einem späteren Zeitpunkt)!
Da
mir die Zeit davonrennt, mache ich besser voran mit den Anleitungen.
Nächstes mal wird’s besser – versprochen!
Material:
- Schere, Stopfnadel
- Häkelnadel
- Garn
Abkürzungen:
- fM = feste Masche
- FR = Fadenring
- Km = Kettenmasche
- Lm = Luftmasche
- LmB = Luftmaschenbogen
- Stb = Stäbchen
- zabStb = zusammen abgemaschte Stäbchen
Anleitung
Blume:
Anfangen
mit FR
R1:
6x (2 zabStb + 1 Lm)
 |
| Runde 1 |
R2:
6x (1 fM + 2 Stb + 1 fM) in LmB
 |
| Runde 2 |
Wenn
du nur die Blume häkeln möchtest: Km in 1. fM, Faden durchtrennen
und vernähen.
Wenn
du mit dem Schal weitermachen möchtest: Km in 1 fM, dann bei der
Anleitung Schal weiterlesen...
Anleitung
Schal:
R1:
Fange mit einer Blume an, trenne den Faden jedoch nicht durch,
sondern häkele 260 Luftmaschen an der Blume. Jetzt den Faden
durchtrennen.
R.2:
- Mache eine neue Blume (ggf. mit einer anderen Farbe) und häkele 15 Luftmaschen dran.
- Nun die Häkelnadel durch die rückwärtige Schleife der Luftmasche einführen und 2 Stb in diese Masche häkeln. (Schaut euch die Bilder an). Ich häkele seit jeher ziemlich stramm. Daher überspringe ich die drei folgende Einstichstellen und häkele drei Stb in der vierten Einstichstelle. Wenn deine Luftmaschen stattdessen herrlich locken und luftig sind, wäre es ratsam, nur 2 Einstichstellen zu überspringen. In diesem Fall auch nicht von 260 Anfangsluftmaschen ausgehen, aber nur von 201!
- Weiter entweder alle 2 oder alle 3 Einstichstellen 3 Stb in einer Einstichstelle häkeln, mit 2 Stb enden, wenn noch 15 Lm bis zur ersten Blume übrig sind.
- Faden durchtrennen
- Schal wenden
R.3:
- Mache eine neue Blume (ggf. mit einer anderen Farbe) und häkele 15 Luftmaschen dran.
- 1 Stb in 1. Stb
- 3 Stb in Lücke zwischen Stb-Gruppen
- 1 Stb in letztes Stb
- Faden durchtrennen
- Schal wenden
R.4:
- Mache eine neue Blume (ggf. mit einer anderen Farbe) und häkele 15 Luftmaschen dran.
- 2 Stb in Lücke zwischen zwischen erste beiden Stb-Gruppen
- 3 Stb in jede weitere Lücke zwischen Stb-Gruppen
- 2 Stb in letzte Lücke zwischen Stb-Gruppen
- Faden durchtrennen
- Schal wenden
Ab
jetzt Reihen 3 und 4 so lange wiederholen, bis gewünschte Breite
erreicht ist.
Zur
Info:
Den
Kinderschal habe ich mit einer 4er Nadel in Cotton Merino (von Drops)
gehäkelt. Er misst mitsamt den Blumen 125 x 10 cm.
Für
den anderen Schal verwendete ich das Effekt-Strickgarn „Maike“
(100% Schurwolle) aus dem Lidl. Mit einer 4,5er Nadel gehäkelt, wird
er mitsamt Blumen 143 x 13 cm.
Das
nächste Granny-Spiration Challenge 2017 Treffen ist am 4. Februar!
Ich
halte euch auf dem Laufenden!
P.S.: Und das haben die anderen gemacht...
- Sigrid
- Sandra
- Alexandra
- Jenny
- Rachel
- Rhelana
P.S.: Und das haben die anderen gemacht...
- Sigrid
- Sandra
- Alexandra
- Jenny
- Rachel
- Rhelana






Beautiful!!
AntwortenLöschenWell done ;-)
Sigrid x
Thank you, Sigrid,
LöschenI like your canvas too!
Have a lovely day,
Marjan
Oh wie schön, meine Sehnsucht nach dem Frühling wächst beim Anblick deines schönen Schals!
AntwortenLöschenLG Sandra
Hallo Sandra,
Löschenbei Blitzeis und Eisregen kommt der Ausblick auf den Frühling gerade recht!
Schönen Sonntag,
Marjan
Aw, would you look at that... Miss Moneypenny is trying to learn the proper form to hold a hook! ;) She seems like she can cause more trouble than a human toddler left alone with finger paints and the dog . Hang in there, Marjan.
AntwortenLöschenThis scarf is so cute! I love how it can be suitable for little ones or adults with just a change of color. Very nice work!
Should I wish you a "stop that"-free day? Have a good one :)
Thank you, Jenny,
Löschena "Nononono!"-free day would be great! Moneypenny does sleep once in a while - but those peaceful periods are so crammed with things to do it seems she's always around and up to some mischief. Wouldn't want to miss her anymore though...
Have a lovely Sunday,
Marjan
Preciosos!!!!! Gracias por el tutorial!!!
AntwortenLöschenBesos.
Muchos gracias, Pilar!
LöschenTener un día precioso,
Marjan
Marjan you are so amazing at this, I love the hat and beautiful scarf for your cousins daughter with the spring colours, but I also really love the adult version! Your tutorial is so detailed and perfect, I only wish I could wrap my head around it! Have a great week!!
AntwortenLöschenThank you very much, dear Katrin.
LöschenI think I'm going to make another one, starting off with 300 stitches though. The pattern looks much more complicated as making the scarf actually is.
Have a lovely day,
Marjan
What a lovely scarf, thank you for sharing the how to and for linking to the stash party, I'm looking forward to part 2. :) x
AntwortenLöschenThank you very much, dear Linda.
LöschenAnd thank you for sharing this wonderful stash buster party (my stash never seems to grow any less though)...
Have a lovely day,
Marjan
It's so pretty! I love the colors, and it makes me think of spring already. Thank you for joining The Really Crafty Link Party this week. Pinned!
AntwortenLöschenThank you very much, dear Teresa!
LöschenHave a lovely weekend,
Marjan
Liebe Marjan,
AntwortenLöschenallerliebst die Halsschleifen mit den Blümchen.....hach....jedesmal wenn ich bei dir reinschaue zeigst du so tolle Sachen und gibst dir die Mühe mit den Anleitungen! Soooooooooooooooo lieb von dir! Danke, Danke....
Drückerli und Herzensgrüassli
Yvonne
Vielen Dank, liebe Yvonne.
LöschenIst mal was anderes, der Schal. Bin auch zufrieden mit dem Resultat, glaube werde noch ein paar zusaätzliche Versionen machen (immerhin besser als noch mehr Weihnachtskugeln)...
Ein schönes und ruhiges Wochenende,
Marjan
Heel erg mooi! Bedankt voor de uitgebreide tutorial.
AntwortenLöschenKreatieve groeten van Anna.
Dank u wel, lieve Anna, en graag gedaan!
LöschenPrettig weekeinde,
Marjan
Wunderschön! ♥ Tolle Farbkombis und die Idee, die Blümchen gleich mit anzuhäkeln, finde ich auch prima. Danke für die Anleitung!
AntwortenLöschenLG Nata
Vielen Dank, liebe Nata.
LöschenGenaugenommen ist der Schal auch wirklich einfach, die Blume ist vermutlich noch das kniffeligste daran. Und es geht schnell voran dank des Granny Stichs.
Liebe Grüße,
Marjan