Helianthus annuus (* + **)
Dear friends,
guess
you've noticed: It's sunflower-time again. Even though there are
plenty of sunflowers around I could not help making one (err... just
one!?) too...
If
you'd also be interested in making this one, here's the pattern:
Materials:
- crochet hook (here 3 mm)
- yarn sewing needle
- scissors
Yarn:
- Phil Coton 3 (Phildar)
Abreviations
(UK terms):
- ch = chain stitch
- dc = double crochet
- dtr = double trebble
- htr = half trebble
- loop = loop made of ch
- mc = magic circle
- ss = slip stitch
- tr = treble
- 2-ch-picot = picot made of 2 chain stitches
Instructions:
Centre:
Start
with mc
Rd.
1: 14 tr into mc
Rd.
2: 14x [2 tr into tr (back stitch only!)]
Rd.
3: 14 x [tr in tr + 2 tr in tr (back stitch only!)] + fasten
off and weave in thread
Pull
mc tight and weave in thread.
Petals:
Round
1:
- Start at any stitch you'd like, back stitch only though!
- ch 10
- 1 dc in 2nd stitch from hook + 1 htr in next stitch + 1 tr in each of next 7 stitches
- skip 2 stitches of centre, ss in 3rd stitch (back loop only!)
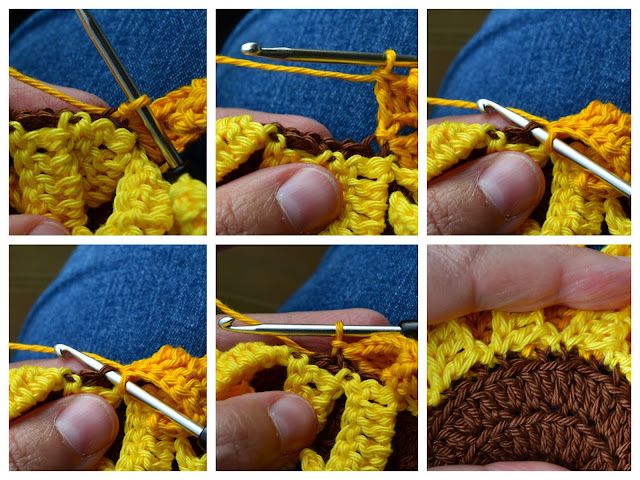
- have a look at pictures
Round
2:
- fold petals of round 1 towards yourself
- start at any stitch left of ss of rd. 1 (back stitch only!)
- ch 10
- 1 dc in 2nd stitch from hook + 1 htr in next stitch + 1 tr in each of next 7 stitches
- ss in 3rd stitch (back loop only!), left of next ss of rd. 1
Round
3 (optional):
- fold petals of round 1 and 2 towards yourself
- start at any stitch left vacant (back stitch only!)
- ch 10
- 1 dc in 2nd stitch from hook + 1 htr in next stitch + 1 tr in each of next 7 stitches
- ss in next vacant stitch (back loop only!)
The petals definitely need blocking!
Leaves:
Start
with mc
Rd.
1:
- ch 3 (= 1 tr) + 13 tr in mc
- ss in 3rd ch from start
Rd.
2:
- have closer look at pictures
- ch 1
- 1 dc in ss + 2x 1 dc + 2 htr + 2 tr + (1 tr + 1 dtr) + 2x 3 tr + (1 dtr + 1 tr) + 2 tr + 2 htr + 2x 1 dc + 2 dc
- fasten off and weave in thread
Pull
mc tight and weave in thread
Stalk:
- ch 30
- dc in 2nd ch from hook
- 17 dc
- ss in leaf (see pictures)
- ss in each stitch of leaf. Caution: 2-ch-picot between dtr-clusters (see pictures)
- ss in starting ss
- 10 dc
- ch 2 + ss in last ch
- 15 ss in each ch
- ss in leaf (see pictures as well as see 1st leaf)
- ss in each stitch of leaf. Caution: 2-ch-picot between dtr-clusters (see pictures)
- ss in starting ss
- ss till end
- fasten off and weave in thread
Now
you can either fasten the stalk onto the flower and use the sunflower
any way you'd like or you can glue both onto a canvas as I did...
Happy
crocheting!
P.S.:
I'll keep in touch!
(*)
Sunflower; from Greek “helios” (= sun) and
“anthos” (= flower)
Liebe Freunde,
unverkennbar
ist jetzt Sonnenblumenzeit! Und auch wenn das Netz überquillt vor
lauter Sonnenblumen, wollte ich doch auch eine beisteuern (naja, nur
eine!? …)
Sollte
Interesse bestehen, auch mal eine Sonnenblume zu häkeln, folgt hier
die Anleitung:
Material:
- Häkelnadel (hier Nr. 3)
- Stopfnadel
- Schere
Garn:
- Phil Coton 3 von Phildar
Abkürzungen:
- ALm = Anfangsluftmasche
- DStb = Doppelstäbchen
- fM = feste Masche
- FR = Fadenring
- hStb = halbes Stäbchen
- Km = Kettenmasche
- Lm = Luftmasche
- LmB = Luftmaschenbogen
- Stb = Stäbchen
- 2-Lm-Pikot = Pikot bestehend aus 2 Luftmaschen
Anleitung:
Blütenmitte:
Anfangen
mit einem FR
Rd.
1: 3 Lm (= 1 Stb) + 13 Stb in FR
Rd.
2: 14x [2 Stb in Stb (im hinteren Maschenglied!)]
Rd.
3: 14 x [1 Stb in Stb + 2 Stb in nächste Stb (alle im
hinteren Maschenglied!)]
Faden
abschneiden und vernähen, FR zuziehen und Faden vernähen.
Blütenblätter:
Runde
1:
- an einer beliebigen Stelle der Blütenmitte anfangen, wenngleich nur ins hintere Maschenglied einstechen
- 10 Lm
- 1 fM in 2. Lm von der Nadel aus + 1 hStb + 7 Stb
- 2 Stiche von Blütenmitte überspringen, also Km in 3. Stich (hintere Maschenglied!)
Runde
2:
- Blütenblätter nach vorne umklappen
- anfangen an beliebiger Stelle, links neben Km von Runde 1, dabei ins hintere Maschenglied einstechen!
- 10 Lm
- 1 fM in 2. Lm von der Nadel aus + 1 hStb + 7 Stb
- Km erneut links neben nächste Km von Runde 1 (hintere Maschenglied!)
Runde
3:
- Blütenblätter von Runde 1 und 2 nach vorne umklappen
- anfangen an beliebiger freigebliebener Stelle, dabei ins hintere Maschenglied einstechen!
- 10 Lm
- 1 fM in 2. Lm von der Nadel aus + 1 hStb + 7 Stb
- Km in nächste freigebliebene Stelle (hintere Maschenglied!)
Die Blütenblätter müssen unbedingt in Form gebracht werden!
Blätter:
Anfangen
mit FR
Rd.
1: 3 Lm (= 1 Stb) + 13 Stb in FR + Km in 3. ALm
Rd.
2:
- Siehe Bilder
- 1 Lm + 1 fM in Km + 2x 1 fM + 2 hStb + 2 Stb + (1 Stb + 1 DStb) + 2x 3 DStb + (1 DStb + 1 Stb) + 2 Stb + 2 hStb + 2x 1 fM + 2 fM
Faden
abschneiden und vernähen. FR zuziehen und Faden vernähen.
Stängel:
- 30 Lm
- 1 fM in 2. Lm von Nadel aus
- 17 fM
- Km in Blatt (siehe Bilder)
- Km in jedem Stich des Blatts, aber Achtung: 2-Lm-Pikot zwischen beide 3er DStb-Gruppen
- Km in erste Km
- 9 fM
- 2 Lm + Km in letzte Lm
- 15 Km entlang Lm-Kette
- Km in Blatt (siehe erste Blatt und Bilder)
- Km in jedem Stich des Blatts, aber Achtung: 2-Lm-Pikot zwischen beide 3er DStb-Gruppen
- Km in erste Km
- Km bis zum Ende
- Faden abtrennen und vernähen
Stängel
nun entweder an Blume nähen und Sonnenblume dann nach Belieben
verwenden oder wie ich Heißklebepistole zücken und Stängel und
Blume auf eine Leinwand kleben.
Viel
Spaß!
P.S.:
Ich halte euch auf dem Laufenden!
(**)
Sonnenblume; aus dem Griechischen „helios“ (= Sonne) und „anthos“
(= Blume)


The perfect Sunflower !!!!!!!!!!!!!!!!!!!!
AntwortenLöschenAnna
Thank you very much, dear Anna!
LöschenLovely! I love sunflowers!
AntwortenLöschenAnd you always make such clear tutorials!
Nice work!
Take care,
Sigrid
Thank you very much, dear Sigrid,
Löschenit took me about three hours to write this tutorial, so I was glad when it was finally finished!
Have a nice day,
Marjan
Das ist wunderschön geworden! =)
AntwortenLöschenVielen Dank, San dra, ich bin auch ganz zufrieden mit den Sonnenblumen!
LöschenSchönen Abend,
Marjan
My goodness Marjan, this is like a bright bit of sunshine. I never would have imagined that crocheting can create such beautiful pieces.
AntwortenLöschenThank you very much, dear Mary!
LöschenSunshine indeed - I had to wait for those few moments the sun actually managed breaking through the clouds...
Have a nice weekend,
Marjan
Wow, die Sonnenblume sieht ganz toll aus Marjan! You are really an artist, it's amazing you made this!
AntwortenLöschenThank you very much, dear Katrin!
LöschenSo cheerful! And, great, clear photos for the tutorial, you make it look easy!
AntwortenLöschenHello Wendy,
Löschendon't know about the "easy" but truth be told: it's not diffucult at all - just give it a try!
Thank you for dropping in,
Marjan
This is beautiful!
AntwortenLöschenThank you very much!
LöschenBeautiful works! So sweet!
AntwortenLöschenThank you for the pattern!
Thank you very much, dear Olga! Hope you'll enjoy the pattern!
LöschenHappy crocheting,
Marjan