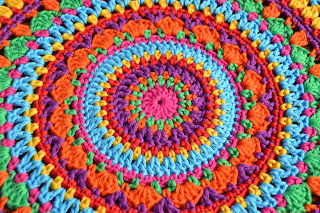
The Melrose Doily (Tutorial) - Melrose Untersetzer (Anleitung)
Tutorial: The Melrose Doily
Notes:
(1) After reading the pattern you may marvel why you hardly ever found join with slip stitch and chain 3. As a matter of fact I prefer to begin a new round (especially when changing colours) with a chainless start (also known as standing stitch). The finished crochet piece just looks much better without these annoying chain stitches. AND: Using a standing stitch also enables me to make an invisible join... I will definitely not try to describe these techniques as there are plenty excellent tutorials and videos to be found online. Do have a look and try for yourselves. It's pretty easy and looks very nice.
(2)
Once in a while you may finish a round and not be all that happy with
the result, because the doily simply isn't flat. Don't panic, this
problem will probably be solved as soon as you've crocheted the next
round.
(3)
This pattern may not be suited for absolute beginners as I reduced
the instructions rigorously to the main features.
(4)
The finished doily measures approx. 27cm in diameter. This will
differ when using another hook and/or yarn. If you'd rather finish
the doily after completing round 8 it will measure approx. 15cm.
(5) This doily can be crocheted
in any yarn you like (using the corresponding hook). You could also
use oddments (as long as you stick to the same yarn type and/or
thickness, otherwise the result could not be all that presentable.
(6)
Whenever I stitched into a dc I've
inserted my crochet hook into the V of the dc (do have a closer look
at the pictures to see exactly where)
Materials:
- crochet hook (here 3,5 mm)
- yarn sewing needle
- scissors
Yarn:
(1)
I crocheted with Gründl Cotton Fun in following shades:
- white
- light yellow
- light green
- green
- black
(2)
Yardage:
- Round 1 = 1m
- Round 2 = 2m
- Round 3 = 3m
- Round 4 = 4m
- Round 5 = 3m
- Round 6 = 5m
- Round 7 = 7m
- Round 8 = either 6,5m (finishing here) or 4,5m (continuing)
- Round 9 = 4m
- Round 10 = 11m
- Round 11 = 9m
- Round 12 = 9,5m
- Round 13 = 7,5m
- Round 14 = 12m
- Round 15 = 8,5m
Abreviations:
- 2-ch-picot = ch 2 + dc in 2nd ch from hook
- 3-ch-picot = ch 3 + dc in 3rd ch from hook
- ch = chain stitch
- loop = loop made of ch
- mc = magic circle
- ss = slip stitch
- tr = treble
- tr2tog = 2 tr together
Instructions:
Round
1:
[ch 4 (= 1 tr + ch 1)] + 7x (1tr + ch 1) + ss in 3rd ch from start
(no
standing stitch here)
Round
2:
8x [(1 tr + ch 2 + 1 tr) in loop]
Round
3:
8x [(tr2tog + ch 3 + tr2tog + ch 1) in loop]
Round
4:
8x {1 dc in ch-1-loop + ch 1 + [4x (1 tr + ch 1) in ch-3-loop]}
Round
8 (when finishing here):
32x (1 dc in tr2tog + ch 3 + tr in initial dc)
Round
8 (when continuing):
- have a closer look at pictures in order to know where to start from!
- 8x {(1 dc in tr2tog + ch 3 + tr in initial dc) + [3x (ch 3 + 1 dc in tr2tog)]}
Round
11:
32x {1 dc in loop + ch 1 + [(1 tr + ch 2 + 1 tr) between tr2tog] + ch
1}
Round
13:
- have a closer look at pictures in order to know where to start from!
- 32x (1 dc in 1st loop + ch 2 + 1 dc in next loop + 3-ch-picot)
Round
15:
- have a closer look at pictures in order to know where to start from!
- 32x {[(1 dc+ 2-ch-picot + 1 dc) in loop] + ch 1 + 1 dc in next loop + ch 1}
Anleitung: Melrose Untersetzer
Notizen:
(1)
Nur einmal habe ich in diesem Muster „Kettenmasche in dritte
Anfangsluftmasche“ verwendet. Das kommt daher, dass ich die
einzelnen Runden mit „stehenden Maschen“ (engl.: standing
stitches) angefangen habe, also ohne die störenden
Anfangsluftmaschen. Obendrein gelingt so auch ein unsichtbares
Rundenende. Das Resultat ist einfach schöner und ebenmäßiger... Da
es im Internet genügend und wirklich hervorragende Beschreibungen
(und auch Videos) zu dieser Technik gibt, werde ich mich nicht an
eine Beschreibung wagen. Schaut einfach mal nach, es lohnt sich!
(2)
Es kann schon mal vorkommen, dass der Untersetzer am Ende einer Runde
nicht wirklich flach liegen möchte. Keine Panik, das Problem behebt
sich bestimmt am nach der nächsten Runde.
(3)
Da ich diese Anleitung aufs Wesentliche reduziert habe, ist sie
vielleicht nicht wirklich geeignet für absolute Anfänger.
(4)
Der fertige Untersetzer misst ca. 27cm im Durchmesser. Mit anderem
Garn gehäkelt (und passender Häkelnadel) wird das natürlich
abweichen. Nach der achten Runde misst der Untersetzer ca. 15cm.
(5)
Meiner Meinung nach kann dieser Untersetzer mit jedem Garn und
entsprechender Häkelnadel gehäkelt werden. Es eignet sich gut, um
Garnreste zu verwerten (daher wird der Garnverbrauch angegeben), aber
dabei dann doch lieber bei derselben Garnsorte und -dicke bleiben,
damit das Resultat auch ansehnlich wird.
(6)
Überall wo „in fM“ steht, habe ich in den V-Ausschnitt dieser fM
eingestochen – schaut genau auf den Bildern nach!
Material:
- Häkelnadel (hier Nr. 3,5)
- Stopfnadel
- Schere
Garn:
(1)
Cotton Fun (Schulgarn) von Gründle in folgenden Farben:
- Weiß
- Hellgelb
- Hellgrün
- Froschgrün
- Schwarz
(2)
Garnverbrauch:
- Runde 1 = 1m
- Runde 2 = 2m
- Runde 3 = 3m
- Runde 4 = 4m
- Runde 5 = 3m
- Runde 6 = 5m
- Runde 7 = 7m
- Runde 8 = 6,5m (wenn hier Schluss ist) oder 4,5m (wenn es weiter geht)
- Runde 9 = 4m
- Runde 10 = 11m
- Runde 11 = 9m
- Runde 12 = 9,5m
- Runde 13 = 7,5m
- Runde 14 = 12m
- Runde 15 = 8,5m
Abkürzungen:
- 2er-Picot: 2 Lm + 1 fM in 2. Lm von der Nadel aus
- 3er-Picot: 3 Lm + 1 fM in 3. Lm von der Nadel aus
- ALm = Anfangsluftmasche
- fM = feste Masche
- FR = Fadenring
- Km = Kettenmasche
- Lm = Luftmasche
- LmB = Luftmaschenbogen
- Stb = Stäbchen
- zab2Stb = 2 zusammen abgemaschte Stb
Anleitung:
Anfangen
mit einem FR
Runde
1:
[4 Lm (= 1 Stb + 1 Lm)] + 7x (1 Stb + 1 Lm) + Km in 3. ALm
Runde
2: 8x
[(1 Stb + 2 Lm + 1 Stb) in LmB]
Runde
3: 8x
[(zab2Stb + 3 Lm + zab2Stb + 1 Lm) in LmB]
Runde
8 (hier endend):
32x (1 fM in zab2Stb + 3 Lm + Stb in Anfangs-fM)
Runde
8 (wenn es weiter geht):
- schaut auf den Bildern, um den Anfang zu finden
- 8x {(1 fM in zab2Stb + 3 Lm + Stb in Anfangs-fM) + [3x (3 Lm + 1 fM in zab2Stb)]}
Runde
11:
32x
{1 fM in LmB + 1 Lm + [(1 Stb + 2 Lm + 1 Stb) zwischen den zab2Stb
der Vorrunde] + 1 Lm}
Runde
13:
- schaut auf den Bildern, um den Anfang zu finden
- 32x (1 fM in 1. LmB + 2 Lm + 1 fM in nächsten LmB + 3er-Picot)
Runde
15:
- schaut auf den Bildern, um den Anfang zu finden
- 32x {[(1 fM + 2er-Picot + 1 fM) in LmB] + 1 Lm + 1 fM in nächsten LmB + 1 Lm}
Viel
Spaß!


Amazing work! Thank you for this tutorial :)
AntwortenLöschenMy pleasure! Happy crocheting!
LöschenWow, you've worked hard! It's so beautiful, lovely colors again...
AntwortenLöschenThank you very much! Have a nice weekend, Marjan
Löschenyour pattern is wonderful but how do you do a 2-dc picot
AntwortenLöschenPretty much as I've written, ch 2, insert hook in 1st ch you've made and make dc. Could have called it ch2-picot (would have been better - I'll change it in pattern!). Hope this helps...
LöschenThat picot edge adds so much character! When I saw these doilies in your other post, I fell in love with the design and all the colors. Thank you for sharing the pattern!
AntwortenLöschenMy pleasure! Hope you'll enjoy the pattern!
LöschenHave a great week!
Marjan
Wow, wunderschön! ♥ Vielen Dank für die Anleitung und die ganze Mühe, die Du Dir damit gemacht hast :-). Einen schönen Abend wünscht Dir Nata
AntwortenLöschenHallo Nata,
Löschengern geschehen! Ich hoffe, du hast viel Spaß beim Nachhäkeln.
Schöne Woche,
Marjan
What a work of art, it looks beautiful! Popping by from the Really Crafty Link party
AntwortenLöschenHow nice of you to pop by! Have been invited to the Link Party last week, did not know it till then, looks like fun though.
LöschenHappy crafting,
Marjan
I especially love the green/yellow one, so pretty! Thank you for sharing at The Really Crafty Link Party! Pinned!
AntwortenLöschenThank you very much, dear Teresa!
LöschenThe rainbow dolly is absolutely gorgeous! All of the colors are so bold and pretty! :)
AntwortenLöschenHello Lauryn, thank you very much!
LöschenHave a nice weekend, Marjan